Keep it, Simple Simon!
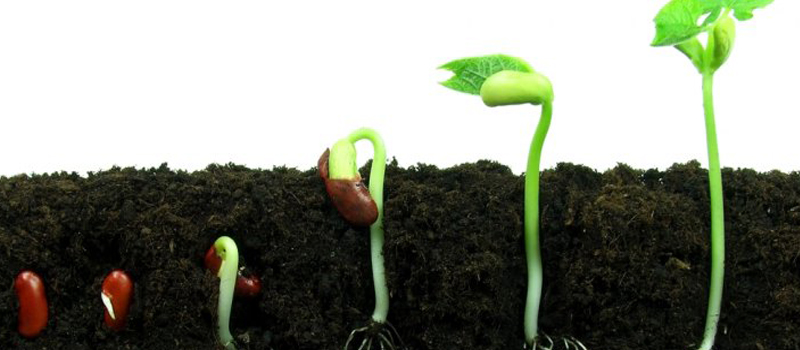
So, plants don’t just automatically start growing in your grow bed of expanded shale or clay pebbles. The starts of the seeding process don’t start in an Aquaponic system. Growing plants from seed in soil or other potting mediums are the best way to start gardening at any time of the season. You would need to have a great method of growing the wanted seeds into seedlings that can survive once they are transplanted into your ecosystem. With the right light and some simple equipment, it’s easy to grow from seed to harvest.
Because each plant has unique seed-starting requirements, it helps to start small by growing just a few varieties. Some seeds — such as tomatoes and basil — are especially easy to start indoors. Here’s how you can get started in getting starts for your garden, whether it be traditional, hydroponic, or aquaponic.
Seven Steps, from Seed to Garden
-
Get the timing right
If doing this via permaculture is the goal, your seed starting is to have your seedlings ready to go outside when the weather is favorable. For those who are doing things indoors (with growing beds and lights), this doesn’t matter as much. Same for those who are growing in the greenhouse that is climate-controlled year-round. Start by looking at the heirloom seed packet, which should tell you when to start seeds inside. Usually, it will say something like, “Plant inside six to eight weeks before the last potential frost.”
Some types of vegetables, such as beans and squash germinate and grow quickly. Be wise to which seeds you are planting in your grow medium first because each seed type grows at different rates. A great place to get these locally in the Wasatch Front is Basil and Rose in Bountiful
-
Find the right containers
You can start seeds in almost any type of container, grow baskets, small dixie cups, etc. work as long as it’s at least 2-3″ deep and has some drainage holes. If you are the DIY type, you might want to grow seedlings in yogurt cups, milk cartons, or paper cups. I prefer the convenience of trays that are made especially for seed starting. It’s easy to fill the trays, the watering system ensures consistent moisture and I can move them easily.
-
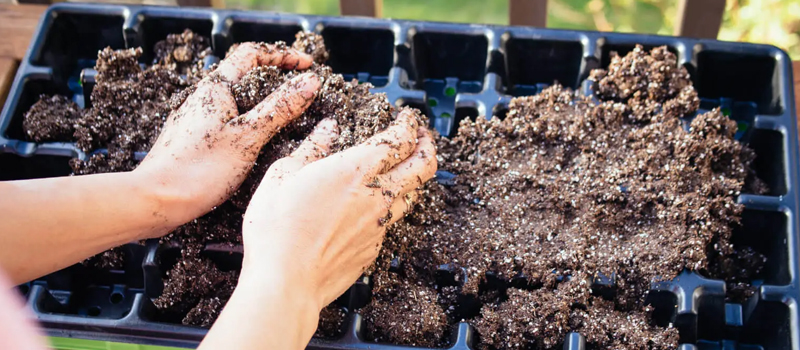
Prepare the growing medium
Choose a growing medium that is made for growing seedlings. Do not use soil from your garden or re-use potting soil from your houseplants. Start with a fresh, sterile mix that will ensure healthy, disease-free seedlings. If you are using any other medium i.e. coconut husks and the like, follow the directions for seed preparation on the container it comes in.
Before filling your containers, use a bucket or tub to moisten the planting mix. The goal is to get it moist but not sopping wet; crumbly, not gloppy. Fill the containers and pack the soil firmly to eliminate gaps.
Remember that most mixes contain few, if any, nutrients, so you’ll need to feed the seedlings with liquid fertilizer a few weeks after they germinate, and continue until you transplant them into the garden.
-
Start Planting
Check the seed packet to see how deep you should plant your seeds. Some of the small ones can be sprinkled right on the soil surface. Larger seeds will need to be buried. For insurance, I plant two seeds per cell (or pot). If both seeds germinate, I snip one and let the other grow. It’s helpful to make a couple of divots in each pot to accommodate the seeds. After you’ve dropped a seed in each divot, you can go back and cover the seeds.
Moisten the newly planted seeds with a mister or a small watering can. To speed germination, cover the pots with plastic wrap or a plastic dome that fits over the seed-starting tray. This helps keep the seeds moist before they germinate. When you see the first signs of green, remove the cover.
-
Water, feed, repeat
As the seedlings grow, use a mister or a small watering can to keep the soil moist but not soggy. Let the soil dry slightly between waterings. Set up a fan to ensure good air movement and prevent disease. I use a fan that’s plugged into the same timer as my grow lights. Remember to feed the seedlings regularly with liquid fertilizer, mixed at the rate recommended on the package.
-
Light, light, light!
Seedlings need a lot of light. If you’re growing in a window, choose a south-facing exposure. Rotate the pots regularly to keep plants from leaning into the light. If seedlings don’t get enough light, they will be leggy and weak. If you’re growing under lights, adjust them so they’re just a few inches above the tops of the seedlings. Set the lights on a timer for 15 hours a day. Keep in mind that seedlings need darkness, too, so they can rest. As the seedlings grow taller, raise the lights.
-
Move seedlings to their final destination gradually
It’s not a good idea to move your seedlings directly from the protected environment of your home into the garden. You’ve been coddling these seedlings for weeks, so they need a gradual transition to the great outdoors. The process is called hardening off. About a week before you plan to set the seedlings into the garden, place them in a protected spot outdoors (partly shaded, out of the wind) for a few hours, bringing them in at night. Gradually, over the course of a week or 10 days, expose them to more and more sunshine and wind. A cold frame is a great place to harden off plants.
