
The greenhouse in the designs of ThatAquaponicsGuy is designed to be portable. That you Sub-Urbian Farmers who may be renting or in temporary situations can build and take down with ya when you go to your next place of residence.
However, if your situation is more of a permanent nature you may want to consider doing a greenhouse the Walipini way. – Never heard of Walipini? – Neither had I until I read a very convincing report.
In the 1990s, a philanthropic arm of the Mormon Church (The Church of Jesus Christ of Latter-Day Saints) called the Benson Institute started an unusual project. A group of volunteers constructed a prototype underground greenhouse for farmers near La Paz, Bolivia. They called the design a ‘Walipini’, meaning place of warmth in the local language. A simple pit with plastic sheeting as a roof, the design minimized costs, while aiming to create a more energy-efficient greenhouse for year-round growing using the stable temperatures of the soil underground.
For several years, the Walipini greenhouse produced crops for the community. The project’s biggest impact, perhaps, came many years later, as the idea has slowly caught on among North American gardeners. Proponents praise the ability of a pit greenhouse to grow year-round using a simple low-cost structure and the earth to naturally heat and cool it. While there is truth in those statements, there is also a great need for caution when building a Walipini greenhouse.
Many North American gardeners mimic the original Walipini design exactly, as laid out in the Benson’s Institutes report on Walipini design and construction. The original greenhouse, importantly, was designed for the climate of Bolivia, 16 degrees South of the equator and with moderate winters. Placed in a different climate and latitude, the same greenhouse will naturally yield different results.
Any well-functioning year-round greenhouse should be customized for the local climate and conditions. The following tips serve to help you design a durable, year-round underground greenhouse – one that is based on the original Walipini design but customized for a North American climate.
Tailor the Structure to Your Sun Angles
The most critical part of customizing a Walipini greenhouse – and the element most first-time growers regrettably overlook – is to design the structure for the solar angles at your latitude. The original Walipini was designed for Bolivia, 16 degrees south of the equator. There, the sun is high in the sky year-round; shallow roof angle will allow light to penetrate the greenhouse throughout the year.
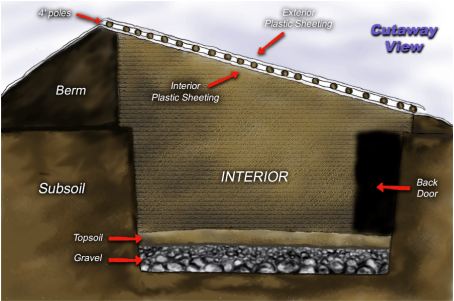
At higher latitudes in North America, the sun is much lower in the sky, particularly in the winter. In Denver, Colorado, for instance, the sun is only 26 degrees off the horizon at solar noon on the winter solstice (compared to 50 degrees in La Paz Bolivia at their winter solstice). If you quickly sketch out a Walipini structure with a floor several feet deep and a flat roof, and a line of 26 degrees off the horizontal, you will see that the sun will not illuminate the floor of the greenhouse during the winter. Rather, plants will be completely shaded, making it challenging, if not impossible, to grow. (You can visualize this issue in the deep pit greenhouse below.)
Of course, you may not want to grow through the winter. Still, the same principles apply: consider the angle of the sun at your location during the seasons you want to grow, and ensure the greenhouse is not buried so deep that you are creating a shaded hole. You can look up the solar angles at your latitude using many online resources like SunCalc or NOAA’s solar position calculator. Then, sketch a profile of your greenhouse, adding the angles of the sun during some key dates, like the solstices and equinoxes.
As described below, you may have to adjust the geometry of your underground greenhouse to ensure sufficient light for growing. More on finding the best angle of roof for your greenhouse is described in this blog by Ceres Greenhouse Solutions. The report by the Benson Institute also describes their logic on choosing their geometry and is essential background reading.
Consider Partially Underground
If you follow the steps above, you will quickly see that it is hard to get full light in a greenhouse at higher latitudes without a much steeper roof angle. That makes the geometry of the typical Walipini greenhouse quite difficult for North American gardeners.
To get full light in the winter, growers at higher latitudes must alter the Walipini design altogether. A popular alternative is an earth-sheltered greenhouse, in which only part of the greenhouse is underground. Some above-ground glazing (i.e. glass or plastic) is used on the South, West and East to provide sufficient light in the winter, when the sun is low in the sky.
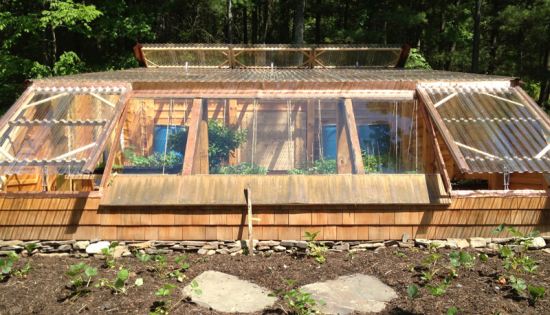
This configuration works very well on a south-facing hillside, as shown in the solar greenhouse by Ceres Greenhouse Solutions below. The north side of the greenhouse is surrounded by earth – providing natural insulation and stable temperatures of the soil — while the South face of the greenhouse transmits plenty of light for heat and growth.

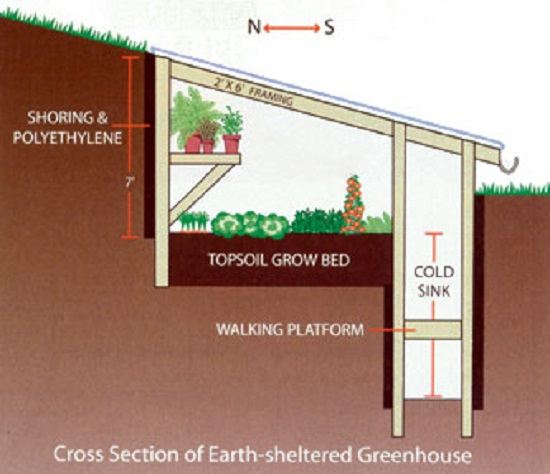
A second alternative, in the likely case that you do not have a south-facing hillside, is to create a shaded area in the front of the greenhouse and use this for something else. This design was popularized Mike Oehler, author of The Earth Sheltered Solar Greenhouse, who grew in low-cost underground greenhouses in Idaho for over 30 years.
A deeper section in the front of the greenhouse will be intentionally shaded, to create a geometry such that the back beds are fully illuminated (shown below). Mike used the shaded area to keep rabbits; other uses might be a storage or work area, or location of aquaponic fish tanks.
Use Durable Framing
The original Walipini design used earthen walls without any interior framing. The sides were enforced with rammed earth. In many climates with different soils, this creates a very short-term structure. Nature abhors a vacuum, as the saying goes. Without interior framing, the sides of the greenhouse will slowly erode or quickly cave in, depending on your soils.
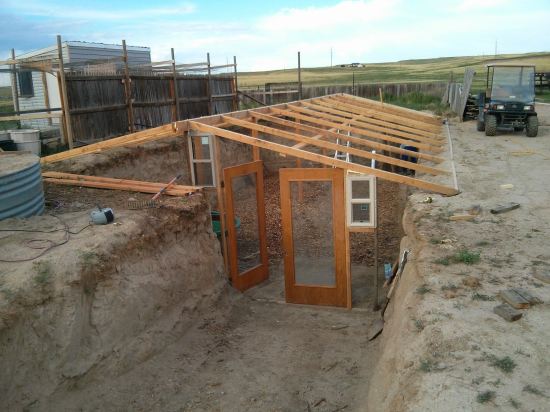
There are several methods for building a durable underground greenhouse. The most common is a wood framed structure with post and beam construction. Wood posts are bored a few feet underground and stabilized with concrete piers. The greenhouse walls are then constructed around this sturdy frame. For a good overview of this building method, see the blog How to Build an Earth-Sheltered Greenhouse by the owners of Raven Crest Botanicals (whose greenhouse in Vermont is shown below).
Alternate construction methods involve concrete — either stacked and re-enforced concrete blocks or a poured concrete retaining wall. These are more expensive options, but also more durable since will eventually erode if exposed to wet soil underground.
Plan for Moisture
To expand on the above point, it is vital to consider that all building materials below ground will be constantly in contact with damp soil. Organic materials, like wood, should be protected. The most common method is wrapping wood posts in plastic, like polyethylene sheeting. There are also specialty fabrics –commonly used under the shingles of roofs – that wick water away from the wood and allow it to drain down.
Additionally, drains should be incorporated around the perimeter of the greenhouse so water does not run down into the structure. Installing a French drain outside of the greenhouse will help prevent the greenhouse from becoming a mud swimming pool during heavy rains. Interior drains are also useful — when watering the greenhouse, water will drain outside, rather than accumulate in puddles in the garden. The original Benson report explains water management quite thoroughly and is a good resource for more.
Don’t Forget Insulation
A common source of confusion about the efficiency of underground structures is the role of the soil. Most people assume that the soil provides insulation. That is true, but only to a degree. The soil is actually a relatively poor insulator (having an R-value of about 2 per inch compared to insulation materials, typically R-7 to R-14 per inch). Thus, if surrounded by freezing topsoil, the greenhouse will lose heat to the surrounding soil.
Building underground is more energy-efficient because the structures take advantage of the stable temperature of the soil deep underground. A few feet underground the soil stays a more moderate temperature (usually between 40-60F for the continental US). It can help keep the greenhouse cooler in the summer and warmer in the winter.
However, soil only begins to moderate in temperature a few feet underground, depending on the climate. The surface layers of soil track air temperature almost exactly. (You can look up an approximation of your soil temperatures using the SCAN website from the Natural Resources Conservation Service.)
Thus, to greatly increase the efficiency of an underground greenhouse, the walls should still be insulated, just like in an above ground greenhouse with passive solar design. Without insulation, the greenhouse will quickly lose any heat stored over the day. Insulation allows the structure to take advantage of the moderate temperatures of the soil deep underground, and will greatly benefit those trying to grow year-round in cold climates.
To insulate the walls of an underground greenhouse or Walipini, one can install rigid sheets of foam board insulation between the greenhouse framing. An added consideration is to select materials that can tolerate moisture. Polystyrene (often called pink board or blue board) is generally considered more durable for underground applications than other foam insulation boards like poly-iso (called bead board).
Set a Realistic Budget
A popular Tree-Hugger article boldly claims that you can “build an underground greenhouse for $300.” While that is certainly possible if you do all the work yourself, and find free materials, more realistic budgets are far higher. The article does not say where it procured its $300 budget; likely it is from the original Walipini project, which was built using volunteer labor and recycled materials in a developing country. It also assumes you are doing all of the excavation yourself, making it only applies to those who own a backhoe or have a spare few months of their life to dig a large pit by hand. Building a durable underground greenhouse in a North American climate can be a significant endeavor, often costing a few thousand dollars. Whatever your budget, is important consider this and set realistic expectations so you are not surprised by costs down the road.
Another surprise for first-time growers is that building underground is not cheaper; often, it is more expensive than a standard greenhouse. To create the same durable and energy-efficient greenhouse that exists above ground, one must do all the same work, but in addition, excavate the site, remove a good deal of soil, and build sturdier walls that can resist the downward pressure of soils, and install drainage systems. That does not make the work unjustifiable. For their energy-efficiency, and stable year-round temperatures, underground greenhouses like Walipinis can definitely be worth it. But, do not opt for a pit greenhouse solely to cut costs.
A Walipini, or any underground greenhouse, can extend the season using a free natural resource. While an excellent strategy for many growers, one must carefully consider how to customize the design or building method to work for the local climate. There is a great deal of misinformation about Walipinis, but there are also some excellent resources to help you build a durable, long-lasting, and abundant underground greenhouse.

