You have it nagging in the back of your brain that you need, no, you must create a space that can be used to sustain you when the tough times hit. Don’t worry, all of us who seek to be truly self-sustaining and independent of economic factors have this knocking around in our brains! No, you aren’t going crazy, and you are not possessed… well not possessed with anything that can be detrimental to you.
What would be truly insane would be not taking the steps with your little patch of land you have control over what would best benefit you and those you love, and continue to trust that society won’t break down to a point that food in the stores become scarce, or heaven forbid, non-existent. We all need to do our part in providing well for our families and it doesn’t matter if you have a 10’x10′ patch or you have a few acres to work with. The principle and the actions need to be the same. Creating the Environments from which you can benefit.
Seasons come and seasons will go, but beyond the factors of water, shelter, and immediate food now it’s time to get seed in the ground. But before nestling those precious seeds into the warming earth, we want to be sure we have prepared for them a safe and healthy home.
Overall you need to be able to do the following in your planned environments:
- Eliminate or reduce pesticide use – this reduces the toxins in water supply, soil, and food sources.
- Conserve water – replace some grass with shrubs and native plants to reduce water usage in landscaping.
- Protect water quality – select landscape features and plants that will reduce water runoff, reducing the amount of pesticide and fertilizer that ends up in storm runoff.
- Remove exotic plant pests – non-native species compete with native flora and pose a danger to native wildlife. The invasive plant, animal, and microbial species are responsible for about 40 percent of the plant and animal species listed as endangered or threatened.
- Plant native species – plants native to the region and ecosystem offer greater benefits to birds and other wildlife and have fewer care requirements, so water consumption can be reduced, as can the need for fertilizer and pesticides.
The most common concern Backyard Farmers have when planning their environment’s landscape is how to visualize it before it’s in the ground. Luckily, this is the easiest obstacle to overcome, and it does not require a drawing table and drafting instruments. A trip to a hobby store and a 10 dollar bill will give you enough material and instruments to create a myriad of designs.
Measure Twice, Draw Once
The most important item I use when creating a landscape design is a tablet of graph paper. I like to use paper that’s ruled with 10 squares per inch; each square on the paper then represents one square foot in my design. This scale is very important in determining how individual plants will fit in a planting and helps estimate the amount of mulch and other materials needed once the design is complete. If a garden area is too large to fit on one sheet of graph paper, you can make each square equal to two feet or more if necessary. You can also tape two or more pieces of graph paper together if you prefer to use the one-foot scale.
Once you have your paper in hand, carefully measure the area you plan to create your environment in with a tape measure or measuring wheel and use them to create your scaled drawing. By using this scaled method, you do not have to include written numbers, which only adds confusion to the design process. Don’t sweat the fractional measurements – in most designs you can just round to the nearest foot.
In addition to the graph paper and measuring tools, I would recommend purchasing a circle template for your home design work. These drawing aids allow you to trace perfect circles on the graph paper to represent the plants you intend to install. Find the template that approximates the scaled diameter of the mature plant and draw in the circle. I typically draw the plants in the design at two-thirds of their listed mature size. There are two reasons for this; first, some plants such as trees may never reach their listed size in my less-than-favorable climate, and second, especially for shrub plantings, I do not want to wait until they are completely mature for the landscape to look full.
As the first doodles of the new design are transferred from measurement to mind to paper, it is nice to use a tracing paper that can be placed over the top of a scaled drawing of the area so you can sketch ideas out without having to redraw every time you want to start over and try something new. The tracing paper also helps avoid minefields caused by an eraser. Once you feel happy with your design it’s time to get to work.
Shapes of Color
When filling in your design with the desired plants, trees, and shrubbery, it is useful, to begin with the plants you know you want to use. If you are following an Overall Garden Planner Checklist as we recommend, you will be looking to plant each year for what you have in the plan. There will be plants that you get in the ground and cultivate them as long as you are able. The fruit and nut trees are a good example of this. So are the berry bushes of all their kinds, as well as great grapevine or two that can flourish in your area.
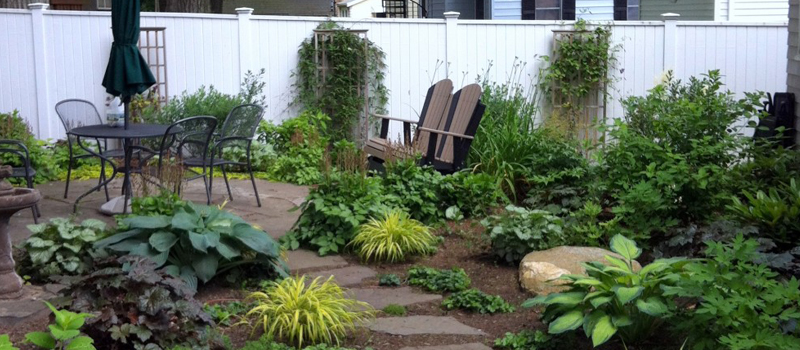
The landscape’s location and purpose are also important considerations in creating an environment. As you have space, you may not only be creating an environment that is used for food production, but you may have an environment for rest and relaxation. The trees and plants you would use for shade and temperature control are vastly different from your food garden varieties. The landscaping most likely needs to be a four-season planting, and plants that provide year-round interest, such as evergreens or others with color during the dormant seasons, make good choices. This also is true for those Wild Edible environments you want to cultivate and move into your part of the world.
Keep in mind that it is utility over aesthetics. Plant accordingly to what you are needing, not necessarily to the color that the plant is or its products have.
Getting It Done
Now that you are all planned away, and you have gathered the seeds and started the seedlings you want, it is time to get your hands dirty.
Let’s take a ‘For Instance’ here. Visualize this with me, you have a normal rectangular backyard that a usual suburban house has. At one corner you have a pine tree, and several cover trees that have vine coverings growing all over that part of the yard. On the other corner, you have cement that was already laid with a shed placed upon it. The cement slab on the side of the yard (to the corner) also follows the back fence for 20 feet.
Lastly in the middle of the yard itself is a green-leaved maple tree that has been there for 15 years or more. It is a good-sized tree. The yard itself slopes towards the house making growing a garden (and the watering of it) problematic. But it does have a good sprinkler system in place.
Because the land isn’t completely flat I have three options here. I could get a medium-sized greenhouse and start my outdoor Aquaponics System and look to summerize/winterize that as much as possible. I could still get the same greenhouse, and place it on that cement slab along the back fence and do waist-level raised beds and start growing that way. Or I could look to terrace the slope with raised beds from the original sloping yard. Each terrace bed taking advantage of the sprinkler system exposure. One reason that the raised beds are a good option (waist high and terraced) is that I can individually tailor the soil in each box to the needs of the plants you are looking to put in there. A pH meter or test kit is a handy tool to have. Sulfur and lime can be used to adjust pH up or down as needed. Compost adds organic matter and nutrients. Sand increases drainage; vermiculite retains the water. Straw, wood chips, newspaper, cardboard, and grass clippings can all be used as mulch to retain moisture and deter weeds
Additionally, I would want to get and plant myself an area around the tree in the middle of the varieties of berries I want to have in the seasons to come. Making sure each one that I get would have equal access to the already existing sprinkler system. Since in this scenario, I don’t have a lot of room to plant fruit trees I would get some established in larger planting receptacles and have my two or three dozen peaches, plums or apricots each year.
For that corner that I already have the trees and evergreen established, I would look to plant and cultivate my wild edibles adventure with a place to rest, read, and replenish. Those types of plants are used to having a cover canopy of the forest and would flourish with the limited sunlight, but plentiful water from the sprinklers.
Lastly, In the area closest to the house I would look to establish my outdoor kitchen. BBQ, clay oven for loaves of bread and pizzas, as well as an open-pit cooking area that could double as the Smores Roast location at night.
The Options Are Endless
So be as specific as you can in your plan, your design, and the actions you take to make both a reality. Get started today, no matter what time of year it is, you can get things in place before the winter, for the spring, in the summer, and even in autumn time. You can be the wise steward of your piece of heaven, move on it as soon as you can!


