This was what got me thinking about all this Self Reliance stuff in the first place. I have very fond memories of my grandmother coming over with her canning supplies, jars, lids, and her favorites to can, peaches, grapes, green beans, and more. The afternoons that we sat and snapped green beans, or got the cucumbers ready for pickling and setting the prepared jars in the water… I cherish that time with my Grandma Collins more and more as I get older.
For some odd reason, (definitely unknown to me) canning in general, as a method of very long-term food storage, has fallen into disuse. Maybe it is because my generation hasn’t passed the torch on this type of food prep and storage, nor kept the tradition of the home garden and preserving the harvest for year-round use. Whatever the reason may be the Canning Craze is simply not thought of with the rising generation. But for people of a self-reliant inclination who are raising a good portion of their own wholesome, chemical-free food and establishing a storage method that is easy and results in tasty food, even years down the road, canning at home is the way to go.
I hold home canning as essential to being self-reliant as any other facet of my lifestyle. Canning allows my family to eat chemical-free, delectable fruits, vegetables, meats, pickles, preserves, jams, and jellies, just waiting for a meal.
 ** Check each jar after it cools with one finger, being sure it is tightly indented; if it is not, it is not sealed and must be redone or eaten soon. It needs refrigerating until then.
I try to can year-round, making up such things as chili, stews, pickles, dry beans, (like black beans), spaghetti sauce, pizza sauce, etc. Whatever the time of the season, I am growing vegetables with my indoor Aquaponics System. Pumping out those tomatoes, peppers, and cucumbers! Even if you aren’t doing the Aquaponics thing, there is nearly anything you can find on a store shelf that can be canned easily at home.
When I’m chatting with people in all I do, nowadays, I’m usually met with the same blank stare and multiple questions like, “Isn’t canning hard to do?” “What does all that take to do?” “Won’t eating home-canned food give you the trots?” and here’s one of my favorites, “Has your canner blown up on ya?”
After I see that there are serious about those questions… I let them know that no, canning is very easy to do, set up, and get taken care of. If you can boil water and tell time you can do it without any trouble or mishap. Properly canned food will give your family a nutritious way to have a snack or those extras that do a body good. And no, the canner has not or will not blow up despite the old wives tall to the contrary. Old canning setups have been passed down from generation to generation and even through very heavy use, are still going strong, with no repairs necessary.
It is simple to start out.
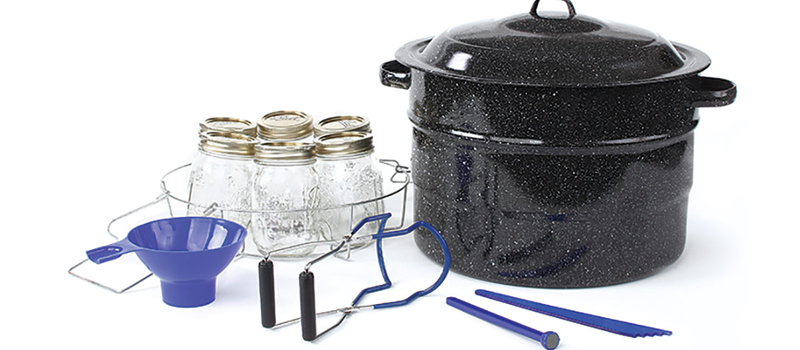
Canning doesn’t even require a pressure canner, which can be a bit expensive (in the areas of $120-$170). [Here’s where we talk about Pressure Canners] A person may begin canning with the easiest of them all, a water bath canner, available at most discount stores for under $20. These are the big blue or black pots with a lid and wire rack you may already be familiar with. You don’t have to be too fancy about it all. Along with the pot and lid, you have the wire carriage that will allow you to lower and raise the jars in and out with individual specialized prongs to lift out the jars one at a time.
Jars do not have to be purchased new. Often, all you need to do is get out the word that you need a half dozen here and there and you can build up a supply of them. Once you have the canning lid and the ring to fit it on, any sized jar can do (all of the openings are the same size large or small jars). Canning jars can last for generations. So treat them as a valuable commodity!
Search online and gather for yourself a laundry list of vegetables that you would like to can AND eat. Get the timetables, and any specific directions for the items you want to preserve. You can go simple, and you can certainly get more elaborate in what you choose to can and seal. Salsas, sauces, and even whole meals can be preserved this way.
Word of Caution with your Jars
Do not try to can using those “country-style” cute jars with zinc lids, glass lids, and rubbers. Not only are they expensive, but you cannot tell if they are properly sealed. A jar improperly sealed will allow the food to spoil is not a good thing.
It Has a Ring to It
More times than not, your family, friends, or neighbors give you jars or you find them at the store, a flea market, auction, or a yard sale, you will also get some rings coming with them. These are reusable for years and years, serving only to hold the flexible metal lid down on the jar rim during the canning process. The rings need only to be solid and strong. Again, it doesn’t have to be fancy-shmancy in any way.
Putting a Lid On It
However, to get the proper seal on things, it is preferred that the lids need to be new for each use, for if the lid has been bent on opening it will not reseal, and the rubber is usually only good for one-time use. Further use may result in seals that come loose or a lid that will not seal. If you are determined to reuse the lids from previous canning, inspect each for the bending, and the rubber seal on the bottom is intact and “flexible” (not hard to the touch).
Here’s What You Do Step-by-Step
Canning with a hot water bath is a simple process:
- Clean, sterilize (boil) the jars to be filled.
- Wipe clean the jar rim (once you fill it with your delicious delectables).
- Place a new lid on the jar, and screw a clean ring firmly onto the jar.
- The filled jars are then placed carefully in the boiling water bath of the canning kettle and settled into an individual place on the wire rack.
- When the canning kettle is filled, the water level needs to be one to two inches above the top of the tallest jars.
- Put the cover on the kettle and return it to a full rolling boil.
- At which time, the prescribed processing time is begun.
- At the end of the processing time, lift each jar carefully out to avoid any burning of hands arms, or fingers.
- Place them on dry folded towels where sealing will occur as the jar cools.
- Usually, you can hear the loud, musical ping as each jar seals.
- Leave the jars alone until they are cool.
- Don’t wipe, poke or move them, or you may end up with an incomplete seal.
It Is THAT EASY
After the jars have cooled (usually overnight), you can remove the rings if you want to, label it so you know what exactly it is (never want to end up with salsa when you wanted spaghetti sauce) and place each jar in a cool, dark, dry area to store. Then if you have done any before this last batch, just remember first in, first out. Rotate the inventory so the oldest jar is the next to be used, to keep its freshness and doesn’t get too old to use.
Equipment
Water bath canning requires a minimum of equipment:
• Canning jars
• Lids
• Rings
• Large-mouth funnel
• Jar lifter
• Kitchen timer
• Large pot with lid
• Metal racks
• Canning Recipes (with instructions of ingredients, methods, and canning times)
What Types of Foods Can You Can This Way?
Most anything can be preserved with this method. Canning like this is good for all high acid foods like jams, jellies, preserves, pickles, tomatoes, tomato sauce, (without mushrooms or meat), all fruits and fruit products such as apples, cherries, peaches, pears, your version of fruit cocktail, juices, etc.
Even sauces – barbecue sauce, chili sauce, catsup, relish, and more. This list would be huge if we took the time to detail every variation and concoction that can be sealed and stored this way. This is where your creativity and diligence in your search for canning recipes come into play. It is a simple way to preserve some fancy dishes!
Here are some more hot water bath canning tips to remember:
- Be careful of the steam and hot jars as they can burn you. Lift the canner lid away from you to allow steam to escape safely.
- When canning tomatoes or tomato products, use “regular” high-acid tomatoes, not low-acid tomato varieties. If unsure, for instance, if you bought them at a farm market add two tablespoons of lemon juice or ½ tsp. citric acid to each quart to ensure the product is acid enough not to spoil. Neither product affects the taste a bit and only increases the nutritional value.
- If the boiling water does not come over the tops of the jars by at least one inch, add more boiling water to accomplish this.
- Adjust your processing boiling time according to your altitude. Most charts are calculated to altitudes of 1,000 feet or less. You must increase the processing time by 5 minutes for altitudes of 1,000 to 3,000-feet, ten minutes for 3,001 to 6,000-feet, fifteen minutes for altitudes of 6,001 to 8,000-feet, etc.
- Don’t try to double recipes or otherwise alter them. You may run into trouble, especially if inexperienced.
- Always use the wire rack of your canning kettle, as the boiling water must circulate well under, over, and between jars. The wire rack will also prevent overheating (and possible cracking) of the jar bottoms and will keep the jars from bumping together while processing, which might result in breakage.
- A combination of hot and cold will crack and break jars. Put hot food into hot jars, cold into warm jars. Do not put hot jars onto cold surfaces or in cold drafts.
- Always check the seal as you store the jars. Each jar lid should be indented in the center, having no give as you gently press down with a finger. If it makes a noise on pressure, or if it can be moved downward, it is not sealed and must either be reprocessed with a new lid or eaten soon.
CANNING PEACHES
A tried and tested recipe for canning peaches at home in light syrup. After trying many different variations, I find that this recipe yields the best-tasting home canned peaches.
INGREDIENTS
- 17-18 pounds peaches
- 1 1/4 cups sugar
- 10 1/2 cups water
- boiling water for peeling peaches
INSTRUCTIONS
-
Bring a pot of water to a boil and submerge peaches for 30-90 seconds. Remove with a slotted spoon and cool in ice water. Peel the peaches with your hands, the skins should slip off easily. If they don’t repeat the boiling process.
-
Slice the peaches in half and remove pits. They can be canned as half peaches, or sliced, it’s up to you.
-
Bring 10 1/2 cups water and 1 1/4 cups sugar to a boil in a stockpot. Stir to dissolve the sugar. Add peaches and cook for 1-2 minutes.
-
Ladle hot peaches into prepared quart canning jars (or pints if you prefer). This recipe should yield a full 7-quart canner batch.
-
Top the peaches in the jars with syrup, leaving 1/2 inch headspace. Remove air bubbles and seal with 2 part canning lids.
-
Process in a water bath canner, 20 minutes for pints and 25 minutes for quarts under 1000 feet in elevation. If you prefer to pressure can, process for 10 minutes at 5 pounds pressure in a weighted gauge pressure canner. (Use 6 pounds in a dial gauge pressure canner.)
DILL PICKLES
INGREDIENTS
- 4-5 Pounds Cucumbers, Small ones only
- 4 Cups Water
- 4 Cups Cider Vinegar or white vinegar, 5% acidity
- 1/2 Cup Pickling & Canning Salt
- 1 Onion Thinly Sliced
- 10-15 Garlic Cloves
- 5 Dill Heads or fresh dill sprigs
- 5 tsp Mustard Seeds
- 5 tsp Dill Seeds
- 5 tsp Coriander Seeds
- 5 tsp Black Peppercorns
- 5/8 tsp pickle crisp optional – 1/8 tsp per pint
INSTRUCTIONS
- Start your water bath canner in a pot big enough to hold 5 one-pint mason jars. The water (and the pot!) should be deep enough once the jars are added there is at least 1 inch of water above the top of the jars. Bring the pot to a boil.
- Prepare a brine by bringing 4 cups water, 4 cups vinegar and 1/2c salt to a boil.
- While the brine and canner are coming up to a boil, gently wash cucumbers to remove any dirt and nip off both ends. Either leave the cucumbers whole or slice into 1/2inch slices.
- At the bottom of each wide-mouth pint mason jar, add 1 teaspoon of mustard seeds, dill seeds, coriander seeds, black peppercorns and the dill heads or fresh herb sprigs.
- Pack tightly with pickles and a few slices of onion. Top 2 with 2-3 garlic cloves. Be sure to leave 1 inch of headspace above the pickles.
- Cover with brine to just submerge the vegetables, being sure to leave 1/2 inch of headspace above the top level of the brine.
- Cap and band mason jars to just finger tight and place into boiling water in your water bath canner. Process for 10 minutes for pints (or 15 min for quarts) below 1000 feet of elevation. (15 minutes for pints at 1,000-6,000 feet)
NOTES
- This recipe makes slightly more brine than you need to can 5 pints of pickles, to make sure you have enough to properly fill all the jars. Store any extra in a mason jar at room temperature for later use.
- The spices can also be adjusted without affecting canning safety, based on your preferences.
- The salt is not necessary for preservation in this recipe and can be adjusted to your tastes. Salt levels in pickles are a very personal thing, and I’ve seen recipes that use A LOT more salt, and just a few that use less. Around 1/2 cup is a good middle ground, but if you like them REALLY salty add 3/4 cup (alternatively, use 1/4 cup for lower salt pickles).
- DO NOT use table salt, it has additives that don’t work well for canning. Lacking pure canning salt, use kosher salt.
- DO NOT adjust the vinegar/water ratio to lower the amount of vinegar. The acidity in the vinegar is what preserves the pickles and makes them suitable for water bath canning. For a more sour pickle, you can increase the amount of vinegar (but never reduce it).
MANGO JAM
INGREDIENTS
- 4 cups chopped mango (from about 7 large mangoes)
- 3 cups sugar
- 1/2 cup lemon or lime juice
INSTRUCTIONS
- Peel, seed and dice mangoes into 1/2 inch cubes. (Place a few small plates into the freezer at this point to use to test for gelling as the jam reaches completion.)
- Place the chopped mangoes into a heavy-bottomed saucepan along with the sugar and citrus juice. Be sure that they only come 1/3rd of the way up the pot at this point to prevent overflows when the mango jam is cooking.
- Bring the ingredients to a boil over medium-high heat, stirring frequently to prevent scorching or overflows.
- Boil hard for about 20 minutes until the jam begins to gel. Test for gelling on a plate that’s been chilled in the freezer, or use an instant-read thermometer to check for gel temperature (220 degrees F, or slightly lower at higher altitudes).
- Pour the jam into prepared canning jars leaving 1/4 inch headspace. Process in a water bath canner for 10 minutes, or simply store in the refrigerator for immediate use. Canned jam should last 1 year in the pantry, and refrigerator jam should last 2-3 weeks.
NOTES
If you’d like to try making a low-sugar mango jam, you’ll need to add commercial pectin. With less sugar, these low pectin fruits just won’t gel on their own even with added citrus juice. The book Preserving with Pomona’s Pectin has a low sugar mango jam recipe that’s very similar to mine, but it has half the sugar. They use the following:
- 4 cups mango
- 1/2 cup lime juice
- 4 tsp calcium water
- 1 cup sugar
- 3 tsp Pomona’s Pectin Powder
Note ~ Mangoes are a low acid fruit and citrus juice is not optional in this recipe. It provides both pectins to help the jam gel, as well as acidity, to lower the ph of the finished mango jam so that it’s safe for canning.
PRICKLY PEAR JAM
INGREDIENTS
- 4 cups prickly pear juice, from about 8-10 fruits
- 2 cups lemon juice
- 4 cups sugar
- 2 tsp pomona’s pectin powder
- 2 tsp calcium water, included with pectin powder
INSTRUCTIONS
- Peel and chop prickly pear fruits. Add them to a saucepan with enough water to cover. Simmer for about 1 hour, adding more water to keep them covered.
- Pour the fruit through a fine-mesh strainer and measure the resulting juice. You should have about 4 cups of juice from 8-10 fruits.
- For every cup of juice, add 1/2 cup lemon juice and 1 cup sugar. Reserve a small amount of sugar about 1/4 to 1/2 cup for mixing with the pectin powder.
- Add calcium water and bring the sugar/juice mixture to a boil. Simmer for about 5 minutes.
- Mix the pectin powder with the remaining sugar. This is important because added on its own the pectin will clump instantly on contact with a liquid. Stir in the pectin/sugar mixture and simmer for another 2 minutes.
- Pour the prickly pear jelly into prepared canning jars, leaving 1/4 inch headspace.
- Store jars in the refrigerator, or process in a water bath canner for 10 minutes.


